I Made A Cheesecake!

Okay, I have never made one before and similar to the previous post, I am putting this here for a couple of reasons.  The first, however, is so that I don’t forget!  As we age, our memory tends to falter especially with excessive amounts of scotch!  SoooOOooo, where was I?

Cheesecake!

Mad props to this recipe as it was dead simple and quite delish and I say that because I generally don’t like cheesecake.  (If you don’t like it, why did you make it?) Well, I made it on a whim – okay?!?  This is not entirely true.  I had the last of our fresh wild Michigan blueberries, farm fresh eggs (foreshadowing) from our CSA and an aging gluten-free graham-type pie crust.  So, that’s why!  I did make some augmentations which I will describe in a minute but I have to share what happened!  You will be glad that I don’t have pictures! Smile

So, this recipe calls for 2 packages of room temperature cream cheese and 4 full eggs + 1 yolk also at room temperature.  Done!  I followed the directions and cracked each egg individually into the stand mixer and blended it together.  When I got to the yolk, I remembered that we had an egg white in the fridge from my wife’s baking the previous day.  Since I was going to do another separation, I went and got it out of the fridge.  We do own an egg separator but being the manly chef (yeah right) that I am, I decided I would crack the egg in my hand to separate the yolk from the albumen. 

I am going to admit that the task lighting in my kitchen is terrible.  I only have a small work surface and the light is on my back which creates a shadow on what I am doing.  The house does have a good amount of windows but since it was nighttime, no love there.

I cracked the egg into my hand over the bowl and threw the shell into the trash.  When I looked at my hand to check the process, it appeared that I might have cracked the yolk.  This would have been par for the course for me.  When I moved my hand over the sink to inspect my work I found a tiny chicken fetus in my hand.  I examined the bowl to catch the albumen and it was a puddle of blood.  THANK GOD this wasn’t one of the eggs I cracked directly into the mixer – that would have been DIS-GUST-ING.  The subtitle of this post could be – A Rooster Got Into The Hen House.

Alrighty then!  Augmentations (besides not including chicken fetus or blood):

First, 8oz of fresh blueberries.  I suppose frozen would work too but I had fresh on hand!  I figured that the lemon and the blueberry would be great complements – I was right IMO!  The link does not include berries but I figured I’d give it a shot.

Second!  I took the lemon zest and put it in the sugar and mixed it together to let the oils soak into the sugar.  Personally, I think this recipe might be better with Meyer Lemon or even Citron but I digress!  I let the zest sit in the sugar for about an hour.  I found that there was great lemon flavor in this but I have to admit that I used the zest of a whole lemon that was on the large side.  Again… bold… flavors…

Everything else was from the instruction set in the link.  Did you know that you can freeze cheesecake?  I didn’t know but Dr. Google did!  My wife and I could only eat about 1/2 of it so we decided to freeze the other half before it went south.  At any rate, enjoy!  I hope there are no chicken fetuses in your eggs!
Tagged with: , , ,
Posted in Cooking

Pasta with Sausage, Rosemary & Grapes

To give credit where credit is due, this recipe came from an email I received from La Dolce Vita Wine Tours.  They have shuttered their doors recently (last couple years) and I receive this when I reached out to them while planning our honeymoon.  This is a very simple recipe but quite delish.  I am pitting it here because I am tired of searching through my email to look for it!  How’s that for laziness?!?!

As usual, I don’t have pictures of the final product.  I am going to include my augmentations because, if you have read any of my previous recipes, you’d know I am heavy handed as well as I make a larger amount for my growing belly – I mean family! 

FYI – This can be made gluten-free with a good GF pasta like Taste Republic made by RP Pasta in Madison, WI.  Serve with a nice salad – Caprese perhaps?  The irritating thing about this recipe is that you need to open or have open 2 bottles of wine!  Drink up, Johnny!

  • 2 tablespoons extra virgin olive oil

  • 2–3 springs rosemary
  • 
1/4 lb. each sweet & spicy ground Italian sausage
 (full lb)
  • 1/4 cup Italian white wine
 (1/2 cup)
  • 1/4 cup Italian red wine (1/2 cup)
  • 
salt

  • 1/2 lb. orecchiette pasta
(2x 10oz fresh pasta of choice)
  • 20-30 seedless green grapes (more as desired)
  • 
freshly ground pepper

(Blatant word for word directions from here…Adjust to suit your needs!)

Bring a large pot of water to boil for the pasta. In a large skillet over medium heat, warm the olive oil. Pick the rosemary leaves off the stem and add to the skillet. Reserve some of the rosemary leaves for garnish. Allow the rosemary to cook for 1 minute to release its aroma. Add the sausage and sauté until it is well-browned all over, about 10 to 12 minutes. Deglaze the pan with the wine: Add the white and red wines to the skillet, and bring to a simmer. Remove the pan from the heat before adding the alcohol, then return the pan to the flame. Use a wooden spoon to scrape up all the flavorful bits of sausage on the bottom of the pan. (The deglazing process intensifies the flavor by incorporating those caramelized pieces of meat back into the sauce.)

When the water reaches a boil, add salt and the orecchiette. Cook the pasta according to package instructions until al dente and drain. Add the grapes to the simmering sauce, and season with salt and pepper. Simmer until the sauce begins to thicken, about 4 minutes. Add the pasta to the simmering sauce. Cook everything together for another 2 minutes, then toss well. Serve the pasta in warm bowls and garnish with the reserved rosemary.

Tagged with: , , , ,
Posted in Cooking

Pasta with Pistachio, Ricotta and Arugula Pesto

Alright, first things first… I am a BAD food blogger.  Why?  I took a grand total of zero pictures of this dish.  I guess you are just going to have to go on faith.  That said, let me see if I can make you take that leap with a little more confidence.  I am not the originator of this recipe.  I adapted it from Milk Street’s Rigatoni with Pistachio, Ricotta and Herb Pesto.  I adapted it because I was ill prepared. So, not only am I a bad food blogger but I am a bad home cook since I didn’t have all the ingredients on hand.  But, I feel that my substitutions held up.  Since I will tell you what I substituted, you could make it either way.  Totally up to you.

Note – This can be made gluten free which I did since, well, I am gluten free.  Only the pasta is the glutenous ingredient.  Personally, I like Taste Republic fresh gluten free pasta made by the RP pasta company.  It tastes better than most out there.

What I liked about this recipe is the great pistachio flavor.  While I added the amount that the recipe called for in the sauce, I added more than required after the fact.  It’s also going to be no surprise that this is a very hearty meal.  Pasta… Cheese… Nuts…. Rib stickin’ goodness.  Hey, at 6’2” 215, I know I am a husky guy and I like to eat good food.  If you don’t want things to be as “dense.” you can lighten the sauce with pasta water.  I did but YMMV.

Alright, here goes.  I am not going to tell you how to make the pasta or which pasta to make.  That’s on you.  What I will say is that there was more than enough sauce for 2 12 oz. packages of pasta.  Making the sauce. you need the following:

  • 1 container of good whole milk ricotta cheese (calls for 1.3 cups, I just used 1 complete container – use less or more)
  • 3/4 cup of raw pistachios (whole) and 1/4 cup chopped for garnish (called for 2 tablespoons)
  • 1 cup of arugula (I basically used around 2 handfuls perhaps 2.5 oz. but the recipe calls for 1/2 cup of loosely packed basil)
  • 1/3 cup of goat’s milk mild cheddar (recipe calls for 2 oz. of parmesan)
  • 2Tbs of EVOO
  • Juice from 1/2 a lemon (which is uncalled for)
  • Cut chives (for garnish unused because I am still a bad home cook)
  • Penzey’s Italian Herbs seasoning (The garnish I used instead)

Basically, take all of the ingredients and put them all in a blender (minus the garnish items) and blend until smooth.  You could probably blend/grind the nuts first but I think some of the oils and flavors might get lost so you may have to blend for a full minute or two.  Once your pasta is cooked, drain and save some liquid and put it in a large bowl.  “Pour” the sauce onto the pasta and mix to coat.  Perhaps you may not want to put all the sauce on depending on how creamy you want it to be.  Once combined, add the garnish and serve.

YMMV…

Tagged with: , , ,
Posted in Cooking

Braised Pork Cheeks (Gluten-Free)

I was lucky enough to be able to acquire some pork cheeks from the local meat monger – Kettle Range.  I don’t often see them and what’s more, I have never made them.  To the internet!!

I found a recipe on the interwebs for braised pork cheeks that looked interesting and that can be found here. The problem I had with it is that it requires the cheeks to be dredged in flour.  I am gluten-free since 2013 and this was not something I wished to do.  I considered the reasons for the flour.  It could be to add a crust to the cheeks during the browning, but since it was going to be braised in liquid, the crust would be destroyed.  Perhaps, it was to enable better browning of the meat for additional flavor.  The meat would brown on it’s own without flour, so, nope.  The last would be a thickener for the braising liquid.  This was the most likely candidate.

Being gluten-free, it was time to make the first alteration.  There are a number of options that can be used:

1) Nothing, just reduce the sauce while the cheeks are resting.
2) Gluten-free flour alternatives (Cup for cup, measure for measure)
3) Corn starch

Well, in my opinion, gluten-free flours don’t absorb moisture the same way flour does and generally doesn’t leave that rich nutty flavor. Corn starch is only a thicken and imparts no flavor.  So, I opted for nothing.

For my second alteration, well, alteration is a strong word.  The recipe calls for smoked paprika.  I have loads of different types of paprika: Spanish smoked, Hungarian half-sharp, Hungarian sweet, and Californian sweet – all from Penzey’s.  I decided to do a mélange of sweets along with the smoked.  What difference did it make?  Well, there was some lovely rich smoky flavors and some sweet notes.  How much did I use, you may wonder?  Not sure.  I have always been heavy handed with spices and teaspoon isn’t very much.  Maybe a 1/2 a teaspoon each?  Not sure.  Probably.  Maybe.  You be the judge.

And finally, the translation.  Thank goodness for Dr. Google.  I remember when I was anti-Google.  I still am for a number of things but for a search engine, I am not.

600 grams is about 1.5 lbs. of pork cheeks.  In my opinion, this is just about right for 2.5 people.  Since I have a young daughter, this was about right.  There were no leftovers however – I eat like a pig!!

150ml is about 1/4 cup of nice dry sherry.  I have had my bottle in the fridge for a while – perhaps a year or more.  I felt a tad bit like Julia Child taking a taste before using it.  Not something I could drink straight but it was still good.  Least, it didn’t taste horrible.  It added a nice flavor.  I am not certain I would substitute it with anything else.

500ml of stock is 16oz or 2 cups.  Beef stock isn’t something that I keep around the house for some unknown reason.  Instead, I used 4 packets of HerbOx low sodium bullion.  It worked with a little more salt than the recipe called for but again, I didn’t measure.

Otherwise, that’s it.  I said I would do something simple and documenting my changes to a published recipe is simple enough.  If you like pork and you like braising, then this note’s for you!

Tagged with: , , , ,
Posted in Uncategorized

Like A Bad Penny…

Well, it’s been a while since I have posted anything here.  I am not sure why but it’s not like I have throngs of devoted followers who are hanging on to the edge of their seats in anticipation for my latest drivel  At any rate, I guess I will be posting somethings now and again… again.  I will start simple since I keep forgetting to capture all the good bits… Weeeeeeee….

Posted in Rant

Savory Lasagna (Gluten-Free)

I made this “off the cuff.”  I was surprised at how well it came out.  Because this was a surprise, I didn’t take any photos of the process or the final outcome.  But, the beautiful thing about lasagna, you probably already know the process and what the outcome is supposed to look like.  Also, if you have access to RP noodles, you can make this gluten-free.  That is how I made it.  They have some great gluten-free noodles.  Lastly, all my spices come from Penzeys.

Ingredients:
1 Package of Lasagna Sheets (RP Gluten Free Lasagna Sheets if you want Gluten-Free)
2 lbs. Ground Bison (Lamb would work just as well)
3.5 lbs. diced butternut squash (frozen is fine)
1 Jar of Pirro’s Rustic Vodka Sauce (Whole Foods)
2 15 oz. Part Skim Ricotta Cheese
1 15 oz. Whole Milk Ricotta Cheese
.5 lbs. shredded mozzarella cheese.
3 Tbs. Butter
Anise Seed
Fennel Seed
Thyme
Marjoram
Sage
Sweet Curry Powder
Garlic
Nutmeg
Cinnamon
Ginger
Cardamom

Preparation:

  1. Roast anise seed and fennel seed.  I’m going to say “to taste” because I like my flavors big and bold.  Therefore, I used perhaps a tablespoon of each or more.  When done, allow seeds to cool.  After the seeds have cooled, add them to a spice grinder and grind them lightly.
  2. Add some olive oil to a large skillet, then sauté the squash with some salt until soft.  When I say soft, I mean that the entire consistency is like mashed potatoes.
  3. When squash has reached the desired consistency, add 3 tablespoons of butter and roasted seeds from step 1 and mix until butter has melted and all have ingredients have blended.  Then remove from heat.
  4. In a bowl, add both containers of ricotta cheese along with thyme, marjoram, and sage to taste.  Again, perhaps a tablespoon of each.  Yes, I really am that heavy handed…Mix all together until the cheese is smooth and has spices incorporated.  Set aside.
  5. In another large skillet, add some olive oil and brown the bison (or lamb) with some salt.  I suggest these two meats because of their “meaty/hearty” flavor.  Bison is leaner than lamb so if you want less fat, go with that.
  6. As the meat cooks, add garlic, nutmeg, cinnamon, ginger and cardamom to taste.  You have already been apprised of my tastes but I only use a touch of cardamom.
  7. Add vodka sauce to skillet and bring to a simmer.  I used  the Pirro’s on a lark.  I just happened to be in Whole Foods and was looking at the sauces and it looked interesting.  I had never had it before but it worked well.  You can use whatever vodka sauce you wish though.
  8. Prepare lasagna in the following layers:
    Noodles
    Squash
    Noodles
    Ricotta Cheese
    Mozzarella Cheese
    Noodles
    Meat Sauce
    Noodles (optional)
    Mozzarella Cheese
  9. Put in oven following the directions on the pasta package.
  10. Let cool and eat… Leftovers will be better after the flavors “marry” overnight.

Thanks!

Tagged with: , , , ,
Posted in Cooking

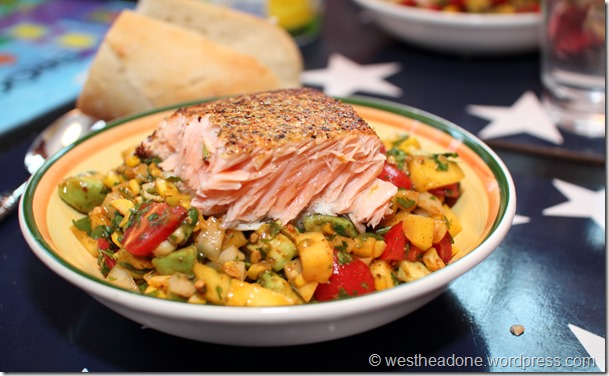
Pan Seared Salmon with Roasted Corn and Mango-Lime Relish

IMG_9360

Alright… So, I had a late meeting last night and by the time I got home, the wife and I were both starving.  The best thing about this, is that it’s quite fast to make and (as far as I am concerned) quite tasty!  As far as this “relish” thing goes, the name just sounded fancy.  It probably isn’t a “relish” but it’s better than calling it chopped vegetables and fruit.

Ingredients:

1 lb. Salmon filet (skin on please…)
1 Lime (for zesting and juicing)
4 oz. (or so) of fresh Cilantro
1 Mango
1 Avocado
2 ears of Corn (fresh is preferred)
12 (or so) small Tomatoes
1/2 of a medium Onion
1 Tbs. of Honey

For seasonings, besides salt and pepper, I use (don’t ask me why but I like it) Mrs. Dash (original flavor) and Penzey’s Arizona Dreaming.  I like Mrs. Dash on fish because it has nice flavor and some fish (like Salmon) tend to be a salty naturally.  The Arizona Dreaming is just incredible on corn, period.

Start by cutting the tomatoes into bite sized pieces and put into a bowl.  Then sprinkle salt on then and mix to get the juices flowing.  Then dice (french) the onion, chop up the mango, avocado, mince the cilantro, zest and juice the lime and add the honey, pepper, just a touch of EVOO, and some Arizona Dreaming with all of the above to the bowl with the tomatoes.  Mix lightly so you don’t crush the avocado.

Next, we need to roast the corn.  You can do this which ever way you like.  If you like to shave the kernels off the cobb or roast them while attached, suit yourself.  I shaved them off the cobb with a knife or mandolin and then roast them in a cast iron skillet with some OO and the Arizona Dreaming.  When that’s finished, you can add it to the bowl with the rest of the ingredients.  Mix lightly but thoroughly.  Once done add to the serving vessel.

Lastly, heat up a skillet for the fish.  When I sear my fish, I do skin-side up (flesh down) first- just enough to (duh) sear the top and add a nice color.  I like my skin to be super crispy so I cook it for longer on the skin side.  The other benefit to this is that, for those of you who don’t like crispy fish skin, the meat comes off the fish quite easily when finished.  I prefer my salmon rare to medium rare but you can prepare it to taste.  Once done, place fish on to “relish” and serve… 

This should yield enough for 2 or 3 people easily.  If you like smaller portion sizes, 4.

Just so you know… All the cooked items were done on the GRILL!!  I love cast iron cooking!

Tagged with: , , , , , , , , ,
Posted in Cooking

(Mis)Adventures in… Ugh…

Subtitled: My first foray with Zucchini blossoms…
Alternate Subtitle: Roasted, stuffed Zucchini blossoms.

IMG_8037

Okay.. So I’ve always wanted to do something with Zucchini blossoms.  I’ve never done anything with them in the past so…  Adventure time!

Last Saturday, at my farmers market, there were a number of vendors selling them.  I walked around and found what I suspected to be some of the freshest and of the best quality.  Keep in mind that I have never purchased or made these before… So.. I was guessing..

When I got home with my newly acquired flowers, I scoured the internet and found mostly recipes for fried blossoms.  I generally try not (but this isn’t a hard and fast rule) to fry things.  I saw very little for anything else.  Furthermore, most sites suggested that the blossoms should be used within 1 day (more or less) of purchase.  Fast forward…

*Looks at watch* Oops.. It’s Tuesday… What’s still in the fridge?  The blossoms.. I open the bag expecting to see quite a bit of dead loss.. To my surprise, 95% of the blossoms were not wilted in the least… Bonus.. I guess I chose wisely…  Now, I have good blossoms but nothing prepared to cook them with…  Okay… stuffed blossoms… Not fried, but they need to be “crispy”… How about roasted!  Okay…What gets crispy when roasted?  Bread crumbs.  Panko it is..

The fried ones are generally filled with cheese… Cheese, what do I have?  Goat.. Mozzarella.. Not a lot of either.. Okay so, let’s do this.. (Turn your oven on Broil at 500 degrees…)

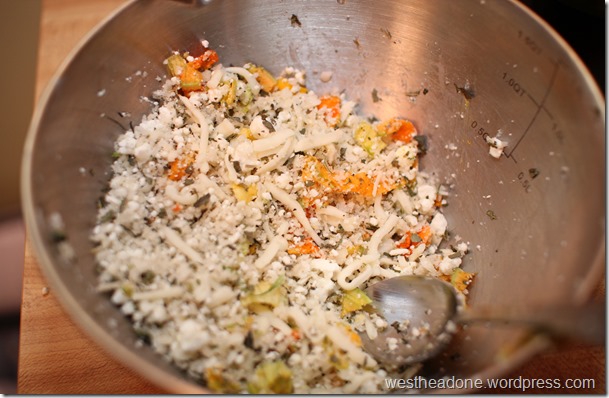
1) Combine the dead loss blossoms, diced up and (totaling to about 4 equal parts) 2 parts Panko bread crumbs, 1 part Goat cheese, 1 part Mozzarella.

2) Add some dried herbs, basil, oregano, marjoram, thyme, rosemary along with some black pepper.

Viola.. Blossom stuffing..

IMG_8023

Time to load them up…

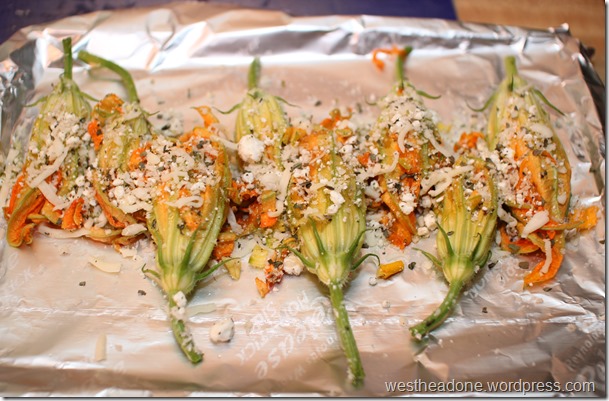
3) Carefully stuff the blossoms with the mixture.  Once stuffed, gently twist the blossoms closed.

4) Lay them in opposite directions on a pan (foil covering optional).

5) Lightly drizzle each blossom with good quality EVOO.

6) Sprinkle remaining stuffing mixture on the top of the blossoms.

7) Add a pinch (or two) of salt over the top.

Viola.. We are ready…

IMG_8025

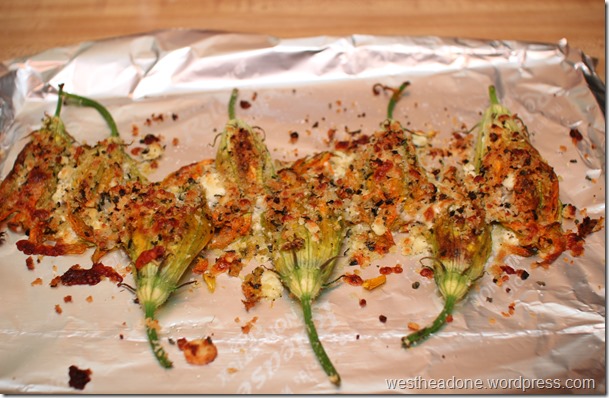
8) Put the pan in the oven on the middle rack.  I didn’t time it specifically but it was about 10 to 15 minutes total.  You can gauge the doneness to your tastes by the coloration of the crispy bread crumbs.

9) Remove and let cool briefly..

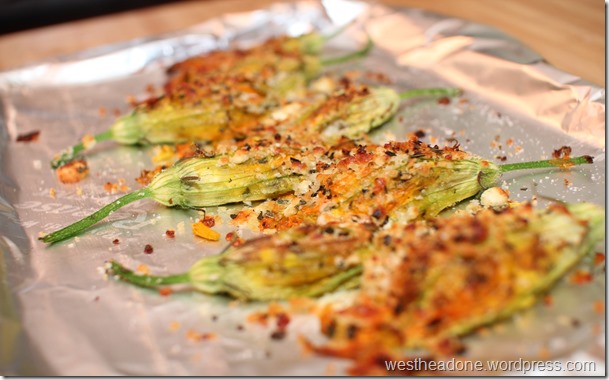
The result was pretty good for being “off the cuff.”  I am sure some tweaks could be made along the way or for someone who knows a lot more about this stuff then I do.  It was crunchy and creamy.. All in all… Thumbs up.. Enjoy..

IMG_8035

Tagged with: , , , ,
Posted in Cooking

Updated Scriptio

image

For starting information, look here.

I recently was introduced to this tool at my new workplace.  What it is in specific is a tiny utility that allows you to script out database objects en masse without using the SQL Server Management Studio (SSMS).  It worked well however it had a few flaws.  I worked these for the past couple days and here it is.  I don’t know what the differences are between this and 0.5.5 since I was given altered source code.  But, what I can say is this.

  1. It works with SQL 2005/2008/2008R2/2012.  It uses SMO so no SQL 2000.
  2. Schema (dynamic) filter implemented and functioning.
  3. Object filter now has trigger type values, assembly value and is sorted.
  4. Object name filter implemented and functioning.
  5. All filters now include previously checked items allowing you to build object list before scripting with exception of ALL in schema and ALL in ObjectType which resets the datagridview filter.
  6. All DDL triggers types can now be scripted (might be buggy, it’s fresh).
  7. System assembly removed from return.

I was not the original author of this, Bill Graziano from the Microsoft SQL Team was.  The “current” (0.6.1 – but not mine) source code can be downloaded from Codeplex.com.

Download the zipped file from here.

If you give it a whirl and find an issue, let me know.  I will see what I can’t do about fixing it.

Thanks!

Tagged with: , , ,
Posted in SQL

SQL Server 2014 CTP Available!

For you SQL folks…  It’s coming.. It’s downloading…

http://technet.microsoft.com/en-us/evalcenter/dn205290.aspx

(I know this is a lame post, but it’s true and I’m excited!)

Tagged with: ,
Posted in SQL
Collected Ramblings
Latest Drivel
Recent Flickr Pix